0. 术语定义
有很多文章中都有提到web server,根据上下文,它一般有三种含义:
- nginx,Apache之类的Http server
- uWSGI,或执行cgi script之类的进程,在这里我叫它application server
- http server + application server, 像借助wsgiref库运行的server
#! /usr/bin/env python

from wsgiref.simple_server import make_server

def application (environ, start_response):

	# 这里从 environ 字典中获取所有的变量值
	response_body = [
		'%s: %s' % (key, value) for key, value in sorted(environ.items())
	]
	response_body = '\n'.join(response_body)

	status = '200 OK'
	response_headers = [
		('Content-Type', 'text/plain'),
		('Content-Length', str(len(response_body)))
	]
	start_response(status, response_headers)

	return [response_body]

# 启动 WSGI  服务器
httpd = make_server (
	'localhost',
	8051,
	application # 这里指定我们的 application object)

# 开始处理请求
httpd.handle_request()
由于我们要介绍的是http server <-> application server与 application server <-> application 两个层次的协议,所以在这里要做一个严格的区分,以防混淆。
1. uwsgi, uWSGI, WSGI 的关系
三个词虽然只是大小写不一样,但是他们表示的东西在三个不同的层次:uwsgi是两个server间通信的协议,WSGI是函数调用接口的定义,uWSGI是实现了uwsgi协议,与WSGI调用规范的server。
-
uwsgi: The uwsgi (lowercase!) protocol is the native protocol used by the uWSGI server. Nginx natively includes support for upstream servers speaking the uwsgi protocol since version 0.8.40.
-
WSGI: WSGI is the Web Server Gateway Interface. It is a specification that describes how a web server (it means application server) communicates with web applications, and how web applications can be chained together to process one request.
-
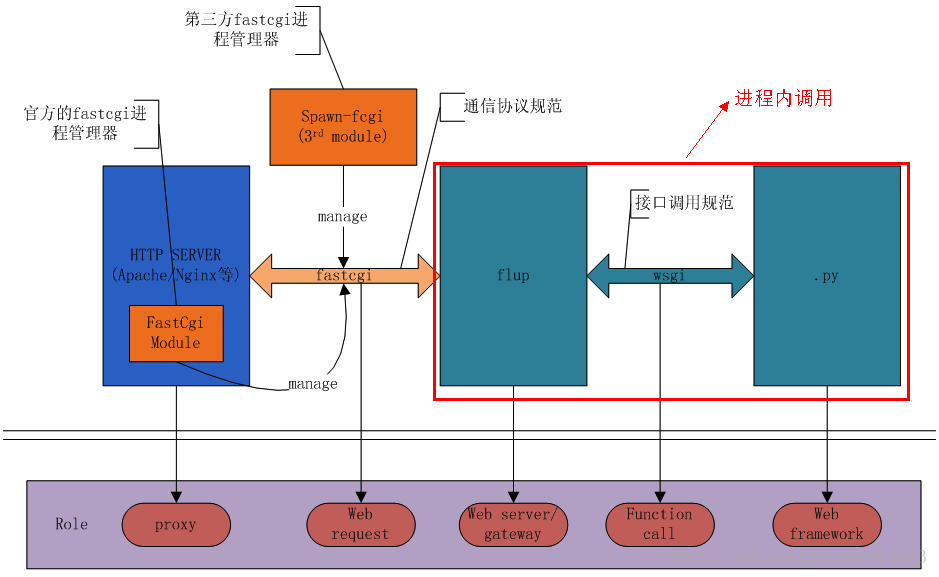
uWSGI: uWSGI is a WSGI implementation.In this tutorial we will set up uWSGI so that it creates a Unix socket, and serves responses to the web server (it means http server) via the uwsgi protocol. At the end, our complete stack of components will look like this:
the web client <-> the web server <-> the socket <-> (uwsgi protocol)uWSGI(WSGI) <-> Python
更形象的用一张图说明:
注: 图片中web server指application server
2. 为什么会有uwsgi
浏览器请求一个页面的流程:
- 浏览器发送请求给服务器,包含请求头和请求体
- 服务器解析请求头和请求体
- 服务器根据请求信息来处理请求,生成返回内容
- 服务器生成响应头和响应体
- 服务器返回响应给浏览器,浏览器显示给用户
一个网站,一般有很多个不同的请求,在这些请求中,基本1,2,4,5步都是固定的,变的只有第三步,所以把这四步抽象出来,让开发者只关注第三步,这样就可以极大提升开发效率。这样就有了application server专注于处理client的不同请求,以及http server与application server之间的通信协议。
http server 与 application server之间协议出现的顺序是: CGI –> FastCGI –> uwsgi(先有了WSGI,后有的uwsgi)
2.1 协议比较
- CGI
- CGI协议让http server 与CGI script一起响应client的请求。
- CGI协议定义了如何把客户的request信息传递给CGI script
- http server负责处理网络连接,网络的数据传输,CGI script负责处理用户请求
-
CGI的一个特点是,对于每一个HTTP请求,Web服务器都会新建一个进程(fork),等应用程序返回结果后,这个进程就会结束。
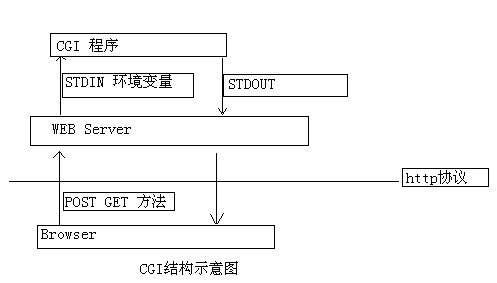
注: 图片中web server指http server
- FastCGI
- CGI的
fork-and-execute做法在HTTP请求多的时候,http server频繁的创建进程,创建进程的开销是非常大的。所以为了提高性能,有了FastCGI - FCGI的做法是在Web服务器启动的时候,就创建多个应用程序进程,当Web服务器接收到HTTP请求时,就把请求分发给其中一个空闲的进程。
- FCGI另一个特点是支持分布式,也就是http server 和application server可以在不同的机器。
- CGI的
- uwsgi
- It is a binary protocol that can carry any type of data.
- Binary management is much easier and cheaper than string parsing
2.2 CGI协议测试
- 环境准备
- windows环境下安装XAMPP,python
- 修改Apache配置文件
httpd.conf
-
创建html & python script
```php ################ cgitest.html ################ <!DOCTYPE html> <html> <head> <meta charset="utf-8"> <title>菜鸟教程(runoob.com)</title> </head> <body> <form action="/cgi-bin/test.py" method="post"> <textarea name="textcontent" cols="40" rows="4">在这里输入内容...</textarea> <input type="checkbox" name="runoob" value="on" /> checkbox--1 <input type="checkbox" name="google" value="on" /> Google <input type="radio" name="site" value="runoob" /> radio--1 <input type="radio" name="site" value="google" /> Google <select name="dropdown"> <option value="runoob" selected>dropdown--1</option> <option value="google">Google</option> </select> <input type="submit" value="提交" /> </form> </body> </html> ################# cgi script ################ #!D:/program Files/Python35/python.exe -u # -*- coding: UTF-8 -*- import os import sys print("Content-type:text/html") print('Set-Cookie: name="rainbow";expires=Wed, 28 Aug 2018 18:30:00 GMT') print('') # 空行,告诉服务器结束头部 print ("<meta charset=\"utf-8\">") raw_data = sys.stdin.read() print('+++++++++++raw data from stdin ++++++++++++</br>') print(raw_data) print("</br>") print('+++++++++++++++prit pid +++++++++++++++++++</br>') print(os.getpid()) print("</br>") print ("<b>environment</b><br>"); print ("<ul>") for key in os.environ.keys(): print ("<li><span style='color:green'>%30s </span> : %s </li>" % (key,os.environ[key])) print ("</ul>") ``` *注:windows环境下python的路径* - 从http server传输给script信息如下:
- POST请求

- GET请求
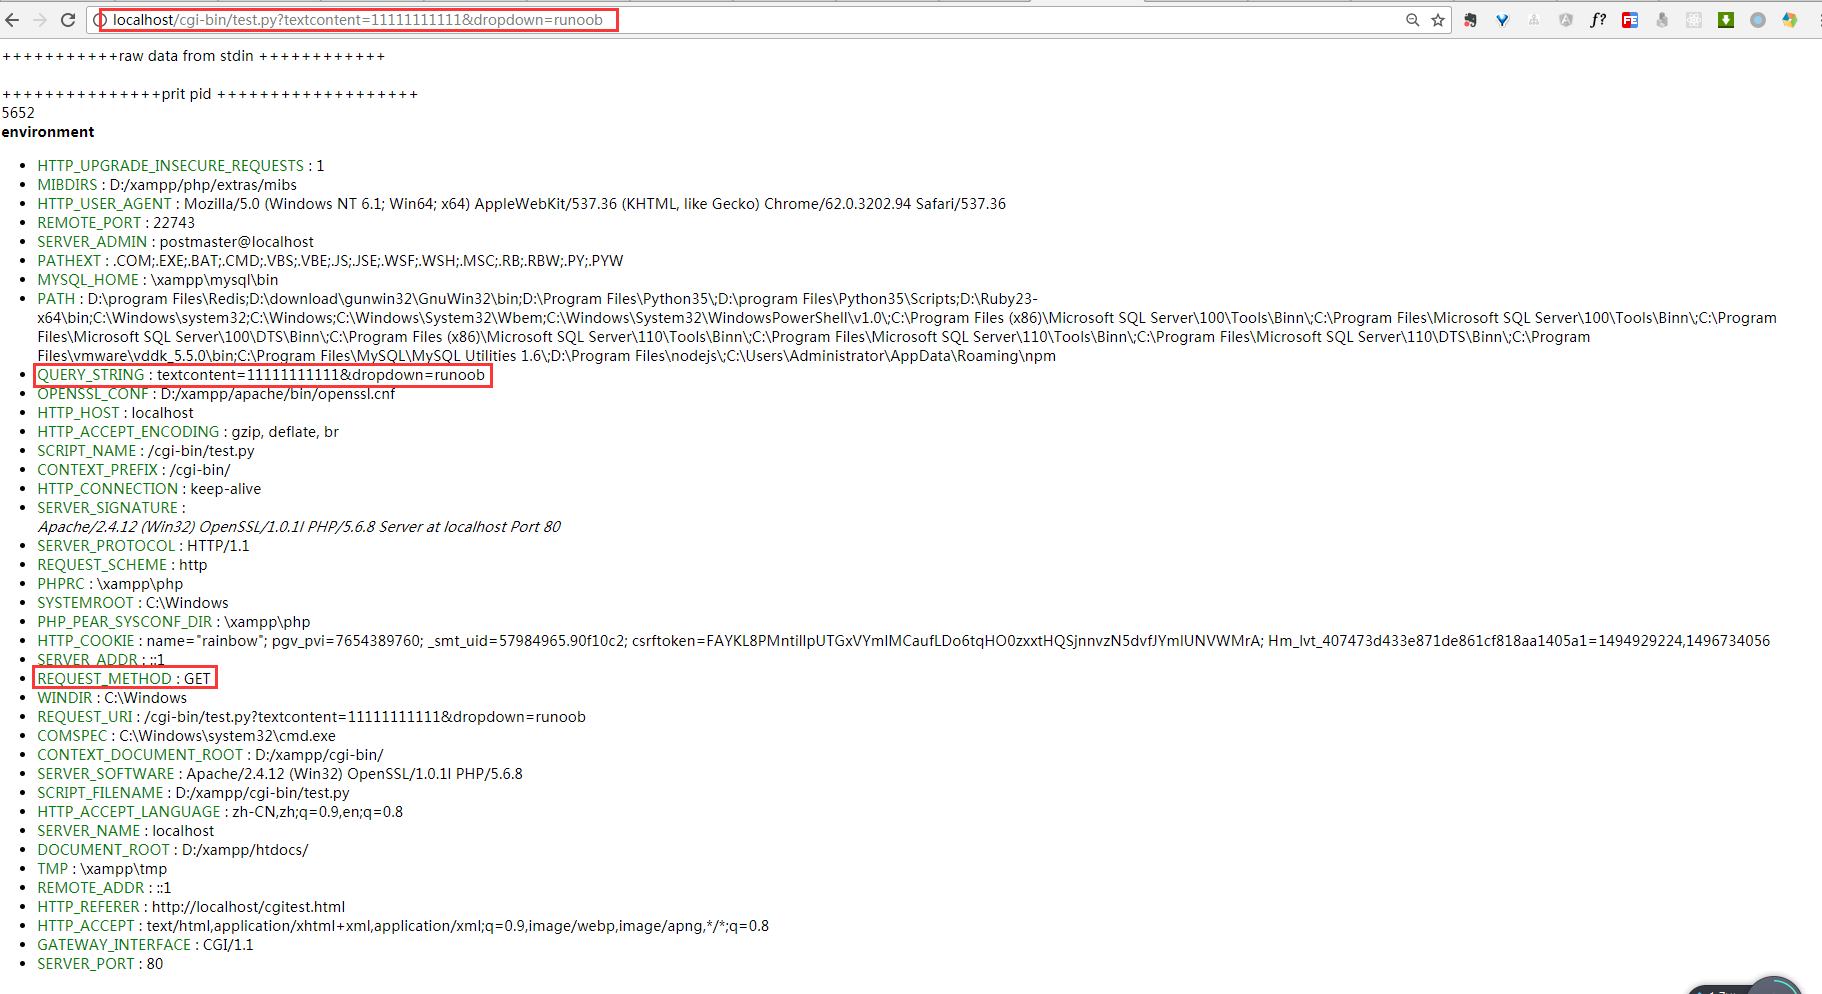
从上图可以验证:
POST请求通过stdin传输用户提交的信息,GET请求通过环境变量QUERY_STRINGPOST请求中,CONTENT_LENGTH表示stdin中传输的字符串长度- 说明CGI是一个文本协议,虽然它对人很友好(可读性强),但是对计算机来说就不太友好了,解析起来非常耗时。
文本协议:一目了然,无须编程接口,无须依赖关系,通常用于比较开放的领域。 二进制协议: C/S要共享同样的数据结构,有编译依赖关系,或者代码copy, 可用于内部通信协议,或者出于保密原因的通信鞋议。
- POST请求
3. 为什么会有WSGI
3.1 为什么会有web框架
把web server细分成了http server处理网络数据传输,和application serve处理用户请求,会提升整个web服务的IO性能。当application server处理用户请求过程中,也有很多通用的事情需要处理,这些通用的处理可以交给web 框架。譬如:
- URL 的匹配和路由转发
- Request/Response 的封装
- 错误、异常的处理
- session 的支持
- 模板的支持
- 数据库 ORM 的支持
- 一些高级功能如 Form 表单对象,admin 后台管理的支持等
框架只需要对开发者开放接口,具体实现交给框架。例如:开发者只需要写好URL路由规则,具体路由的实现,交给框架。
3.2 WSGI
-
web框架有很多,例如:Django,Flask,webpy,bottlepy。为了保证application server能和众多的web框架work together,而不用修改任何代码。就有了WSGI。
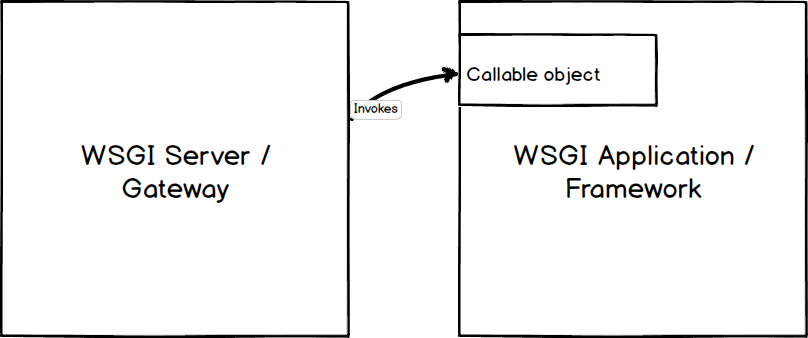
-
application server
```python # Construct environment dictionary using request data env = self.get_environ() # It's time to call our application callable and get # back a result that will become HTTP response body result = self.application(env, self.start_response) # Construct a response and send it back to the client self.finish_response(result) ``` -
callable object
 ```python
 def simple_app(environ, start_response):
     """Simplest possible application object"""
     status = '200 OK'
     response_headers = [('Content-type', 'text/plain')]
     start_response(status, response_headers)
     return ['Hello World']
 ```
4. WSGI 接口实现
4.1 server端
# Tested with Python 3.6, Linux & Mac OS X
import socket
from io import StringIO
import sys


class WSGIServer(object):

    address_family = socket.AF_INET
    socket_type = socket.SOCK_STREAM
    request_queue_size = 1

    def __init__(self, server_address):
        # Create a listening socket
        self.listen_socket = listen_socket = socket.socket(
            self.address_family,
            self.socket_type
        )
        # Allow to reuse the same address
        listen_socket.setsockopt(socket.SOL_SOCKET, socket.SO_REUSEADDR, 1)
        # Bind
        listen_socket.bind(server_address)
        # Activate
        listen_socket.listen(self.request_queue_size)
        # Get server host name and port
        host, port = self.listen_socket.getsockname()[:2]
        self.server_name = socket.getfqdn(host)
        self.server_port = port
        # Return headers set by Web framework/Web application
        self.headers_set = []

    def set_app(self, application):
        self.application = application

    def serve_forever(self):
        listen_socket = self.listen_socket
        while True:
            # New client connection
            self.client_connection, client_address = listen_socket.accept()
            # Handle one request and close the client connection. Then
            # loop over to wait for another client connection
            self.handle_one_request()

    def handle_one_request(self):
        self.request_data = request_data = self.client_connection.recv(1024).decode('utf-8')
        # Print formatted request data a la 'curl -v'

        print(''.join(
            '< {line}\n'.format(line=line)
            for line in request_data.splitlines()
        ))

        self.parse_request(request_data)

        # Construct environment dictionary using request data
        env = self.get_environ()

        # It's time to call our application callable and get
        # back a result that will become HTTP response body
        result = self.application(env, self.start_response)

        # Construct a response and send it back to the client
        self.finish_response(result)

    def parse_request(self, text):
        request_line = text.splitlines()[0]
        request_line = request_line.rstrip('\r\n')
        # Break down the request line into components
        (self.request_method,  # GET
         self.path,            # /hello
         self.request_version  # HTTP/1.1
         ) = request_line.split()

    def get_environ(self):
        env = {}
        # The following code snippet does not follow PEP8 conventions
        # but it's formatted the way it is for demonstration purposes
        # to emphasize the required variables and their values
        #
        # Required WSGI variables
        env['wsgi.version']      = (1, 0)
        env['wsgi.url_scheme']   = 'http'
        env['wsgi.input']        = StringIO(self.request_data)
        env['wsgi.errors']       = sys.stderr
        env['wsgi.multithread']  = False
        env['wsgi.multiprocess'] = False
        env['wsgi.run_once']     = False
        # Required CGI variables
        env['REQUEST_METHOD']    = self.request_method    # GET
        env['PATH_INFO']         = self.path              # /hello
        env['SERVER_NAME']       = self.server_name       # localhost
        env['SERVER_PORT']       = str(self.server_port)  # 8888
        return env

    def start_response(self, status, response_headers, exc_info=None):
        # Add necessary server headers
        server_headers = [
            ('Date', 'Tue, 31 Mar 2015 12:54:48 GMT'),
            ('Server', 'WSGIServer 0.2'),
        ]
        self.headers_set = [status, response_headers + server_headers]
        # To adhere to WSGI specification the start_response must return
        # a 'write' callable. We simplicity's sake we'll ignore that detail
        # for now.
        # return self.finish_response

    def finish_response(self, result):
        try:
            status, response_headers = self.headers_set
            response = 'HTTP/1.1 {status}\r\n'.format(status=status)
            for header in response_headers:
                response += '{0}: {1}\r\n'.format(*header)
            response += '\r\n'

            for data in result:
                response += data.decode('utf-8')
            # Print formatted response data a la 'curl -v'
            print(''.join(
                '> {line}\n'.format(line=line)
                for line in response.splitlines()
            ))
            self.client_connection.sendall(response.encode('utf-8'))
        finally:
            self.client_connection.close()


SERVER_ADDRESS = (HOST, PORT) = '', 8888


def make_server(server_address, application):
    server = WSGIServer(server_address)
    server.set_app(application)
    return server


if __name__ == '__main__':
    if len(sys.argv) < 2:
        sys.exit('Provide a WSGI application object as module:callable')
    app_path = sys.argv[1]
    module, application = app_path.split(':')
    module = __import__(module)
    application = getattr(module, application)
    httpd = make_server(SERVER_ADDRESS, application)
    print('WSGIServer: Serving HTTP on port {port} ...\n'.format(port=PORT))
    httpd.serve_forever()
4.2 application端
import sys
sys.path.insert(0, './hello')
from hello import wsgi

app = wsgi.application
注:需要自己django-admin startproject hello 创建一个django project